


Facing the Fall Transition: Why Your System Might Hesitate
As the mid-fall October heating startup finally arrives, our team at Carl's Quality Cooling and Heating LLC typically sees a spike in service calls from homeowners wondering why their systems are acting up. Relying on our local service expertise and area tips can help you determine exactly why your system might be struggling to keep your home comfortable. Temperatures in the region are finally beginning to drop, prompting that long-awaited shift from non-stop air conditioning to cozy, reliable heating. But sometimes, that very first cycle of the season does not go exactly as planned. We often hear from homeowners who notice strange burning odors, surprisingly weak airflow, or a system that completely fails to change modes when the thermostat is adjusted.
Are these just normal seasonal quirks, or are they early warning signs of a mechanical failure? Before the real winter chill sets in, it is crucial to understand what your heat pump is doing behind the scenes. Your system has been working relentlessly for months in a single mode, and asking it to suddenly reverse its operation can expose underlying wear and tear. Prompt attention to these hesitation symptoms can prevent a complete, highly inconvenient mid-winter breakdown. If you need professional heating services or want to schedule heat pump repair before the weather turns freezing, knowing what to look for is your first line of defense.
The Stuck Reversing Valve: When Your System Won't Switch Modes
To understand why a heat pump might fail to cool or heat properly after sitting in one mode for an extended period, you have to look at its most defining component: the reversing valve. Unlike a traditional air conditioner, a heat pump is designed to move heat in two directions. During the summer, it absorbs heat from inside your home and pumps it outside. During the winter, it absorbs ambient heat from the outdoor air and pumps it inside. The component responsible for directing this flow of refrigerant is the reversing valve.
The Mechanics of a Mode Switch
The reversing valve relies on a sliding mechanism controlled by an electrical solenoid and internal refrigerant pressure. When you switch your thermostat from cool to heat, the solenoid activates, shifting the internal slider to redirect the high-pressure and low-pressure refrigerant gas. However, in our years of repairing HVAC units across Conroe TX, a pattern we see often is that systems run in continuous cooling mode for the vast majority of the year. Because the valve sits immobilized in the cooling position for months on end, the internal lubrication can settle, and microscopic corrosion can form along the sliding track.
Signs Your Valve is Mechanically Compromised
Prolonged inactivity in a single mode significantly increases the risk of the valve physically sticking. If your reversing valve is failing to shift, you will likely notice several distinct symptoms:
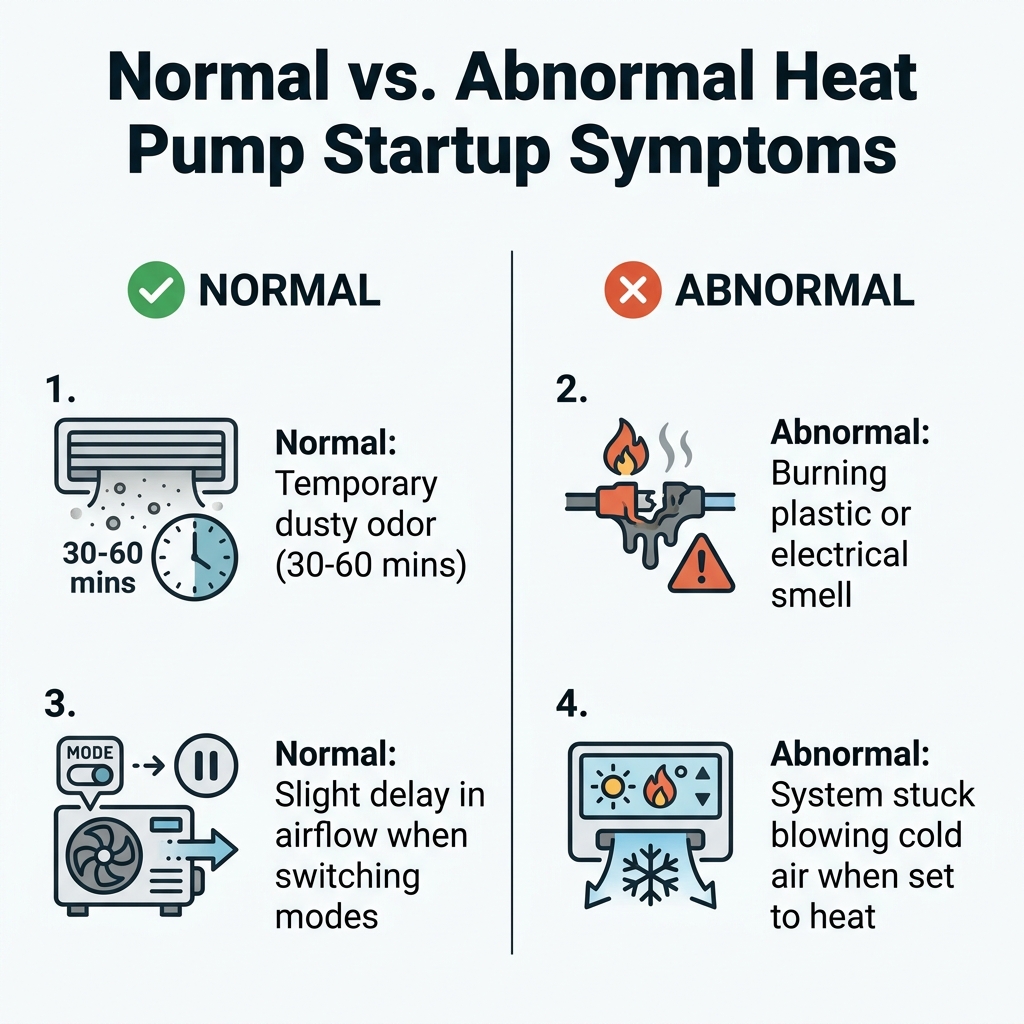
• Trapped in the previous mode: The most obvious sign is a system that blows cold air when set to heat, or vice versa, because the valve is physically locked in its summer position.
• Lukewarm or tepid airflow: If the slider only moves halfway, high-pressure and low-pressure gases can mix, resulting in air that is neither sufficiently hot nor cold.
• Audible clicking outdoors: You may hear a distinct clicking or humming noise coming from the outdoor cabinet as the electrical solenoid attempts to shift the stuck valve without success.
• System hesitation: The system may try to start, fail to achieve the correct pressure differential, and shut back down as a protective measure.
It is critical to clarify that a stuck reversing valve is a complex mechanical and refrigerant issue. It requires professional diagnostic tools to measure pressure differentials and electrical currents. It is absolutely not a simple DIY fix. While our professionals handle comprehensive air conditioning cooling services and heating repairs, a homeowner attempting to force a stuck valve manually can cause catastrophic damage to the compressor.
Decoding First-Cycle Odors: Dust Burn-Off vs. Electrical Hazards
In our experience, one of the most common sources of anxiety we field calls about during the mid-fall October heating startup is the sudden presence of a burning smell coming from the vents. When a homeowner turns on the heat for the very first time in months, a distinct odor often fills the house, leading to immediate concerns about fire hazards or failing equipment. Understanding the source of these smells is vital for your peace of mind and your family's safety.
The Phenomenon of Dust Burn-Off
Over the course of a long summer, particulate matter, pet dander, and household dust inevitably bypass the air filter and settle on the dormant indoor heating coils and heat strips. Because the system is only being used for cooling, these heating components remain cold and inactive, acting as a gathering place for debris. High humidity levels in the region significantly increase the likelihood of this particulate matter adhering stubbornly to the indoor coils. The moisture in the air makes the dust sticky, creating a thicker layer of buildup. When the heating elements finally ignite or the indoor coil temperature spikes for the first time in the fall, this accumulated layer of dust literally burns off.
This "dust burn-off" creates a distinct, somewhat dusty, burning odor. While it can be alarming, it is a completely normal part of the seasonal transition. The normal timeframe for this harmless burn-off odor is relatively short, typically resolving completely within 30 to 60 minutes of continuous operation.
When Odors Indicate a Serious Problem
While dusty smells are normal, other odors are major red flags. It is crucial to contrast normal seasonal smells with dangerous indicators that suggest an active electrical failure or a mechanical breakdown.
• Dusty, slightly charred smell — Likely Cause: Accumulated dust burning off dormant heating elements — Safety Level: Normal / Harmless — Required Action: Allow system to run; should dissipate within 30-60 minutes.
• Musty, dirty sock smell — Likely Cause: Bacterial growth or mildew on the indoor evaporator coil — Safety Level: Poor Indoor Air Quality — Required Action: Schedule a professional coil cleaning and inspect drainage.
• Burning plastic or melting rubber — Likely Cause: Melting wire insulation, failing capacitors, or seized motors — Safety Level: Highly Dangerous — Required Action: Shut system down immediately at the thermostat and breaker. Call a professional.
• Sharp, metallic, or ozone smell — Likely Cause: Overheating electrical components, arcing wires, or failing blower motor — Safety Level: Highly Dangerous — Required Action: Shut system down immediately. Do not attempt to run the system.
If you detect any dangerous odors, or if a standard dusty smell persists for more than a few hours, we advise immediate system shutdown. Do not wait to see if an electrical smell will go away on its own; professional inspection is required to prevent fire hazards and permanent equipment damage.

Safe Troubleshooting Steps Before Calling a Professional
When your system hesitates or fails to produce warm air in Conroe TX, it is natural to want to fix the problem immediately. While complex mechanical issues require a licensed technician, there are several safe, actionable troubleshooting steps you can take to rule out minor, easily correctable issues. Empowering yourself with these basic checks can save you the time and expense of a service call for a simple oversight, without encouraging dangerous DIY electrical work.
Step-by-Step Safe Troubleshooting:
1. Verify the thermostat settings: It sounds overly simple, but a surprising number of heating issues stem from the thermostat. Ensure the system is explicitly set to "Heat" rather than "Auto" or "Cool." Verify that the set temperature is at least three to five degrees higher than the current ambient room temperature to properly trigger a heating cycle.
2. Inspect and replace clogged air filters: A dirty air filter is the number one cause of poor HVAC performance. Clogged filters severely restrict airflow, causing the indoor coil to suffocate. This lack of airflow can cause the system to overheat and shut down prematurely on a high-limit safety switch, perfectly mimicking a major mechanical failure. Check your filter by holding it up to a light source; if you cannot see light passing through, replace it immediately.
3. Check the circuit breakers: Your heat pump relies on two separate electrical circuits—one for the indoor air handler and one for the outdoor compressor. Check your main electrical panel to verify that neither breaker has tripped. If a breaker is tripped, you may reset it exactly once. If it trips again immediately, stop. A repeatedly tripping breaker indicates a dead short or a grounded compressor, which is a serious safety hazard.
4. Ensure outdoor unit clearance: Walk outside and inspect the heat pump cabinet. Ensure it is not choked by fallen autumn leaves, overgrown vegetation, or debris. Heat pumps need clear airflow on all sides to extract ambient heat from the air efficiently.
As licensed professionals, we must explicitly warn against opening electrical panels, attempting to bypass safety limit switches, or trying to test the reversing valve solenoid manually with a multimeter. High-voltage HVAC components carry enough current to cause severe injury or death. If the safe troubleshooting steps above do not resolve your heating issue, it is time to call a professional.
How Prolonged Texas Summers Stress Your HVAC Equipment
To fully understand why fall switchover issues are so common, it is necessary to contextualize the incredible wear and tear your system endures throughout the year. Our technicians know firsthand that Conroe's extreme summer heat forces the reversing valve to sit in cooling mode for over 8 months. That is two-thirds of the year where the system operates under maximum thermal load, fighting high temperatures and heavy humidity day in and day out.
The Cumulative Toll of Continuous Cooling
This 8-month continuous cooling season takes a massive toll on the overall HVAC system. Every component is pushed to its operational limits. The blower motor runs almost non-stop to circulate conditioned air. The electrical capacitors endure thousands upon thousands of start-up cycles, slowly degrading their internal ability to store and release electrical charges. The contactors inside the outdoor unit open and close repeatedly, leading to pitted and scarred metal surfaces that can eventually stick or fail to make a strong electrical connection.
The Shock of the Seasonal Transition
When October arrives, the unpredictable transition weather requires the system to rapidly switch between heating and cooling. You might need air conditioning during a warm afternoon and heating during a surprisingly chilly night. This rapid cycling adds immense mechanical stress to a system that is already fatigued from the summer. The reversing valve, which has been stationary for months, is suddenly commanded to shift back and forth repeatedly.
Systems that have been working overtime are far more susceptible to unexpected failures during these seasonal transitions. If you noticed that you had an undersized heat pump struggling on 100-degree days earlier in the year, that same system has likely sustained accelerated wear and tear. A unit that barely survived the grueling summer is often the first to experience a component failure when asked to take on the new demands of the fall heating season.
Why Precision Diagnostics Matter for Fall Maintenance
Given the immense strain placed on your equipment during the summer, crossing your fingers and hoping for the best during the mid-fall October heating startup is a risky strategy. This is where the value of professional, disciplined maintenance truly shines. Preventing mid-season breakdowns requires more than just changing a filter; it requires a comprehensive assessment of the system's mechanical and electrical integrity.
Visual Checks vs. Mechanical Diagnostics
There is a vast difference between a superficial visual check and a comprehensive mechanical diagnostic. A visual check might involve simply looking at the unit to see if it turns on and listening for obvious rattling noises. A precision diagnostic, however, involves utilizing specialized tools to measure the exact health of the system. Technicians use multimeters to check the precise microfarad readings of aging capacitors, manifold gauges to ensure refrigerant pressures are perfectly calibrated for heating mode, and temperature probes to calculate the exact temperature rise across the indoor coil.
During a proper fall maintenance visit, critical components are meticulously evaluated. Electrical connections are tightened to prevent voltage drops that can burn out motors. The defrost control board is tested to ensure the outdoor unit will not turn into a block of solid ice when winter temperatures drop. The reversing valve is manually cycled and monitored to guarantee it shifts smoothly and completely without internal bypassing.
The Value of Integrity in Service
Because Carl's Quality Cooling and Heating LLC is a veteran-owned company, our team brings military-grade precision and integrity to every diagnostic assessment. You can trust that the evaluation of your system is honest, thorough, and focused entirely on safety and performance, rather than unnecessary up-sells. If an older system has completely failed and a replacement is necessary, your technician can also explain how generic federal tax credits may apply to qualifying high-efficiency heat pump upgrades, helping to offset the investment.
Ultimately, investing in a routine preventative maintenance plan provides the ultimate peace of mind. It transforms the anxiety of the seasonal switchover into confidence, knowing your system has been rigorously tested, proven safe, and is completely ready to handle whatever the winter weather brings.
Frequently Asked Questions About Heat Pump Troubleshooting
Why does my heat pump smell when switching to heat?
Your heat pump smells when switching to heat because dust, pet dander, and airborne debris settle on the dormant heating coils during the long cooling season. When you initiate the mid-fall October heating startup, the system physically burns off this accumulated dust as the heating elements reach high temperatures for the first time. This dusty odor is completely normal, temporary, and should naturally dissipate within an hour of continuous operation.
How to tell if my heat pump reversing valve is stuck?
You can tell if your heat pump reversing valve is stuck if the system continually blows cold air when set to heat, or warm air when set to cool. You may also hear a distinct clicking or humming sound coming from the outdoor unit as the electrical solenoid attempts to shift the valve mechanism without success. Because this involves complex internal refrigerant pressures, it requires professional testing to confirm the mechanical failure and safely replace the component.
Is a burning smell from the heater dangerous?
A dusty burning smell during the first cycle of the year is usually harmless and expected as debris burns off the coils. However, a smell that resembles burning plastic, melting rubber, ozone, or electrical wires is highly dangerous and indicates a serious malfunction. If you detect any electrical or chemical odors coming from your vents, you should shut off the heating system immediately at the thermostat and contact a professional.
Why is my heat pump hesitating to switch to heat?
Your heat pump may hesitate to switch to heat due to thermostat communication delays, a mechanically sticking reversing valve, or low refrigerant levels. After sitting idle during the long cooling season in Conroe TX, the internal sliding mechanisms can become sluggish or temporarily stick. Additionally, inadequate refrigerant negatively impacts the system's ability to properly pressurize and execute the physical mode switch.
How long does the heater burn off smell last?
The normal heater burn-off smell typically lasts between 30 to 60 minutes of continuous operation during the very first use of the season. You might also notice it very faintly over the first few subsequent cycles as the remaining microscopic particles clear out of the system. If the burning odor lasts longer than a single day, grows noticeably stronger, or causes eye irritation, a professional inspection is required to rule out safety hazards.
What should I do if my heat pump is running but not cooling or heating?
If your heat pump is running but not conditioning the air, first verify your thermostat is set correctly and replace any dirty or clogged air filters that might be suffocating the system. Next, check your main electrical panel for any tripped breakers connected to either the indoor air handler or the outdoor compressor. If these basic troubleshooting steps fail to resolve the issue, you must schedule a professional diagnostic to check the compressor and the reversing valve.
Get Professional Answers for Your Heat Pump Issues
Navigating the transition from summer cooling to winter heating shouldn't be a source of stress. While temporary dusty smells and minor startup delays are a normal part of the mid-fall October heating startup, persistent odors, weak airflow, or a complete failure to switch modes are not. Having a clear, regionally relevant explanation of your system's health ensures you aren't left guessing when the temperatures drop. Don't wait for a minor hesitation to turn into a major mid-winter breakdown; take proactive steps to protect your comfort today. If your system is struggling with the seasonal switchover, schedule heat pump repair with a licensed professional to ensure your home is safe, efficient, and fully prepared for the colder months ahead.