

The Urge for Instant Relief on Humid Summer Afternoons
When humid July afternoons in Southeast Texas push the heat index into the triple digits, walking into a stuffy, sweltering house can feel entirely suffocating. Your first instinct is likely to march straight to the wall and crank the dial down to 65 degrees. It is a completely natural psychological reaction to want immediate comfort, but our team at Carl's Quality Cooling and Heating LLC constantly has to warn homeowners about the danger of setting your thermostat below 70 to cool the house faster. This widespread habit is one of the most common ways we see local homeowners accidentally damage their own cooling equipment.
In our experience repairing HVAC systems across the Conroe area, we find that many people assume a lower temperature setting tells the system to work harder or pump out colder air. In reality, this approach does not accelerate your comfort at all. Instead, it places immense mechanical strain on your equipment and sets the stage for a cascading series of failures. Before you rely on this myth for quick relief, it is crucial to understand how your system actually operates. If you are already dealing with a system that struggles to keep up with the heat, reaching out for professional air conditioning services is a much safer bet than pushing your thermostat to its absolute limit.
The Single-Speed Reality: How Your Air Conditioner Actually Works
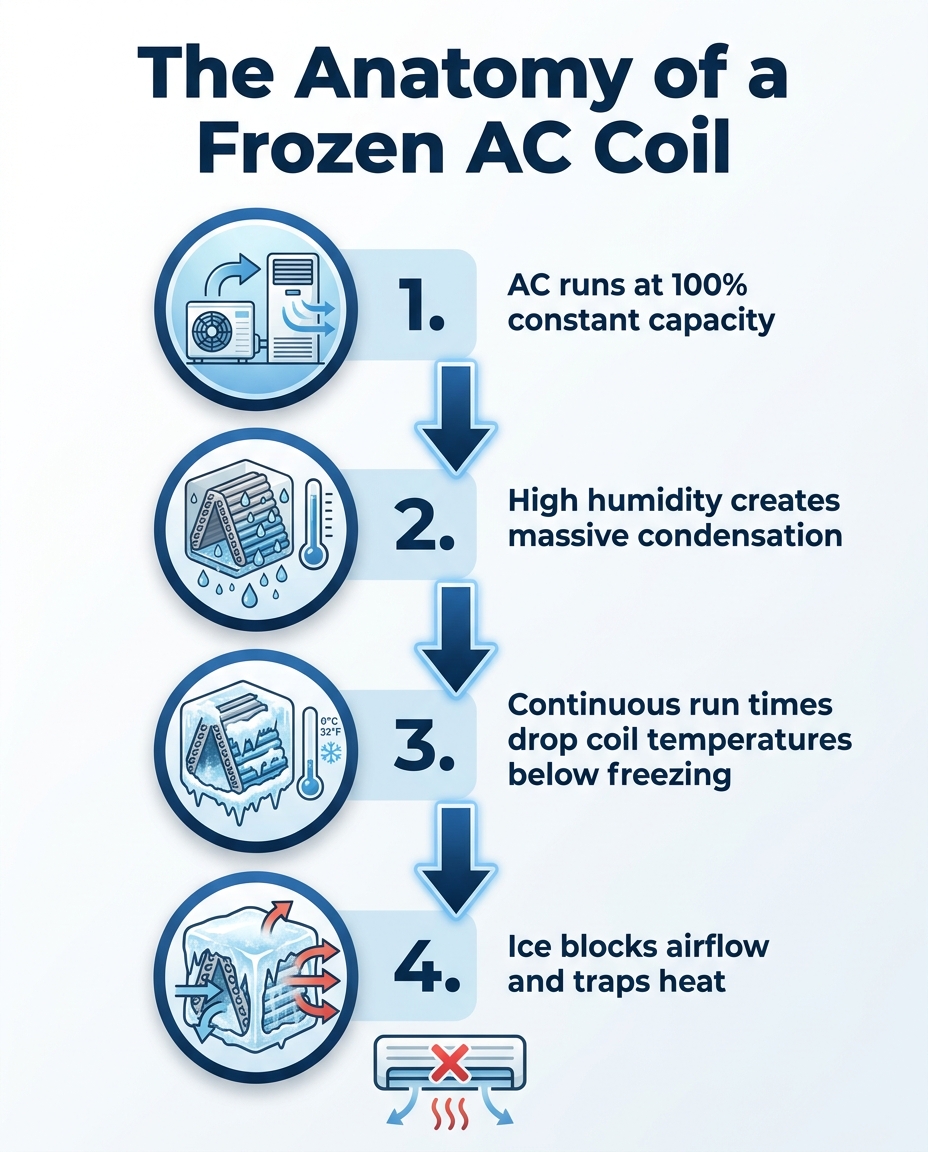
Our technicians often explain to homeowners that to understand why drastically dropping the temperature is ineffective, you have to look at the basic mechanics of residential cooling. The vast majority of central cooling systems operate at a single, constant speed. They run at exactly 100 percent capacity whenever they are turned on, and zero percent capacity when they are off.
Your thermostat is essentially just an on-and-off switch. It is not an accelerator pedal. When you adjust the dial, you are not telling the system how hard to work; you are only telling it how long to work. The air blowing out of your vents is the same temperature whether your target is set to 75 degrees or 65 degrees. The system removes heat from your indoor air at a fixed, unchangeable rate based on its tonnage and design.
The "All or Nothing" Cooling Cycle
When the indoor temperature rises above your setpoint, the thermostat signals the compressor and fans to start. The system will run continuously at its maximum fixed speed until the indoor air matches the target temperature on the wall. Once that target is reached, the system shuts down and rests. By setting a below 70°F thermostat setpoint, you are simply demanding that the equipment run in a continuous, grueling marathon without any natural cycling breaks. It does not pump colder air; it just refuses to stop pumping.
Why a Drastic Thermostat Drop Doesn't Mean Faster Cooling
Think of your cooling system like a car that only has one speed limit. If your car can only travel at exactly 60 miles per hour, setting your destination for 500 miles away instead of 50 miles away will not make the car drive 120 miles per hour. It just means the car has to drive for a much longer period of time. Your HVAC system operates on the exact same principle.
Forcing the system to run non-stop places unnecessary and severe strain on the compressor, which is the heart of your outdoor unit. Compressors are designed to cycle on and off, giving the internal motors time to cool down. When you deny the system these resting periods, the mechanical components overheat, leading to premature wear and tear. Furthermore, this continuous operation leads to a massive spike in energy consumption without actually accelerating your comfort level. If you want to help your AC during heat waves, the worst thing you can do is force it to run endlessly.
• Lowering the dial makes the air colder. — The Mechanical Reality: The air temperature coming from the vents is always the same.
• Dropping to 65°F cools the room faster. — The Mechanical Reality: The system removes heat at a fixed rate; it just runs longer.
• The system works harder at lower settings. — The Mechanical Reality: The system always works at 100% capacity when turned on.
• A lower setting is a harmless trick for quick relief. — The Mechanical Reality: Continuous operation causes severe compressor strain and freezing.
The Perfect Storm: High Humidity and Frozen Evaporator Coils
The most immediate and severe danger of setting your thermostat too low involves the indoor evaporator coil. This component sits inside your air handler or furnace and has two primary jobs: absorbing heat from your indoor air and extracting moisture (humidity) from that same air. As warm indoor air blows over the frigid copper coils, water vapor condenses on the metal, much like water droplets forming on the outside of a cold glass of iced tea.
In Conroe area homes, our team frequently deals with the fallout of our extreme July dew points—often sitting well above 70 degrees—which create massive amounts of condensation on these coils. This is where the "perfect storm" occurs. When you set the thermostat below 70 degrees, the system runs non-stop. Because it never cycles off, the temperature of the evaporator coil continues to drop until it falls below the freezing point of water. All that heavy Texas condensation suddenly turns to solid ice. One local homeowner experienced this firsthand during peak Texas heat when their faulty AC unit failed completely after struggling to keep up. Our technicians provided the necessary AC work, servicing the unit, addressing the frozen components, and fixing the underlying problem to finally provide real relief from the heat. If you want to manage humidity safely, investing in proper indoor air quality services is far more effective than manipulating the thermostat.
The Chain Reaction of a Frozen AC
Once a thin layer of frost forms on the coil, a catastrophic chain reaction begins. Ice acts as a powerful insulator. It forms a barrier between the warm indoor air and the cold refrigerant inside the copper tubes. Because the refrigerant can no longer absorb heat, the system just blows room-temperature air back into your house. The thermostat registers that the house is still hot, so it commands the system to keep running. The ice block grows thicker and thicker until it entirely encases the coil, blocking airflow completely. Worse, because the refrigerant isn't absorbing heat, it remains a liquid as it travels back outside to the compressor. Compressors are built to pump gas, not liquid. When liquid refrigerant hits the compressor—a condition known as "slugging"—it can destroy the valves and cause total, catastrophic failure.

Warning Signs Your System is Freezing Up
Identifying a freezing evaporator coil early can save you from a complete system breakdown and a ruined compressor. Because the ice builds up inside the dark cabinet of your indoor unit, you usually will not see it right away. However, when our trucks roll out to emergency calls in July, we typically see a few clear symptoms as the ice begins to restrict airflow and heat transfer. If you notice any of these signs, your system is likely in distress:
• Noticeable reduction in airflow: Place your hand over the supply registers. If the air feels weak, sluggish, or barely noticeable compared to normal, ice is likely blocking the passage of air through the indoor coil.
• Warm air blowing from the vents: Because the ice acts as an insulator, the refrigerant cannot absorb heat. The air blowing from your vents will feel room-temperature or slightly warm instead of crisp and cold.
• Visible frost or solid ice: Check the copper refrigerant lines running from your indoor unit to the outside, or look closely at the indoor coil itself if accessible. Any visible white frost or solid ice is a massive red flag.
• Unusual hissing or bubbling noises: As the system struggles with improper pressure levels and restricted refrigerant flow, you might hear strange gurgling, hissing, or bubbling sounds coming from the indoor air handler.
• Water pooling around the indoor unit: As ice occasionally melts during brief off-cycles, it can overwhelm the condensate drain pan, leading to puddles forming around the base of your indoor equipment.
What to Do (and Not Do) When You Suspect a Frozen Coil
If you recognize the warning signs of a frozen system, you must act quickly to prevent permanent damage to the compressor. Taking the right steps immediately can save your equipment, while taking the wrong steps can result in a destroyed coil that requires a full replacement. As a veteran-owned, family-run business, our priority at Carl's Quality Cooling and Heating LLC is giving honest, practical advice to help our neighbors avoid unnecessary emergency repairs and protect their investments.
1. Turn the thermostat from 'Cool' to 'Off': This is your most urgent step. Shutting off the cooling demand stops the outdoor compressor from running, halting the production of cold refrigerant and preventing liquid slugging.
2. Turn the fan setting from 'Auto' to 'On': By forcing the indoor blower fan to run continuously, you circulate warm indoor air over the frozen coil. This natural, gentle airflow is the safest way to melt the accumulated ice.
3. Check and replace dirty air filters: A clogged filter severely restricts airflow, which is the second leading cause of frozen coils after low thermostat settings. Swap out any dirty filters immediately to ensure the system can breathe once it thaws.
4. Wait patiently for the ice to melt: Depending on the severity of the freeze, it can take anywhere from a few hours to a full day for a solid block of ice to melt completely. Place towels around the unit to catch any overflowing water from the drain pan.
CRITICAL WARNING: Never attempt to chip away the ice with screwdrivers, knives, or scrapers. Never use a heat gun or hair dryer on high heat to speed up the process. The copper fins and tubes on your evaporator coil are incredibly fragile. A single slip or excessive heat application can easily puncture the pressurized lines, releasing all your refrigerant and guaranteeing a wildly expensive repair. If the system continues to freeze after you thaw it and replace the filter, you need to contact our HVAC technicians for a proper mechanical diagnosis.
Finding the Right Balance for Comfort and Efficiency
Over our years of maintaining HVAC systems in Southeast Texas, we've found that keeping a comfortable home during peak summer does not require pushing your equipment to the breaking point. By adopting smarter thermostat habits, you can achieve excellent comfort while protecting your system from the dangers of freezing and excessive strain.
The Department of Energy recommends a summer thermostat setting of 78 degrees Fahrenheit when you are home and awake. While this might sound high at first, it provides an optimal balance between indoor comfort and mechanical efficiency. If 78 degrees feels too warm, drop it gradually by one degree at a time until you find a comfortable baseline, but try to avoid dropping it below 72 degrees during the peak heat of the day.
Smart Thermostat Strategies for Summer
Instead of relying solely on the thermostat, use ceiling fans in occupied rooms. Fans create a wind-chill effect that evaporates moisture from your skin, making the room feel up to four degrees cooler without requiring the AC to run a single extra minute. Just remember to turn the fans off when you leave the room, as they cool people, not spaces.
Additionally, utilize a programmable or smart thermostat to manage temperatures proactively. Program the system to begin gradually cooling the house an hour before you arrive home from work. This gradual approach prevents the house from becoming an oven and eliminates the desperate urge to demand an instant, drastic temperature drop when you walk through the door. Finally, the best defense against a struggling system is proactive care. Keeping up with routine AC maintenance ensures your coils are clean, your refrigerant levels are precise, and your system can handle the heavy summer workload without freezing up.
Frequently Asked Questions About Summer Thermostat Settings
Does setting the thermostat lower cool the house faster?
No, setting your thermostat lower does not cool your house faster. Air conditioners cool at a constant rate, meaning they operate at a single speed (100 percent capacity) whenever they are turned on. Dropping the temperature below 70 degrees only forces the system to run continuously for a longer period of time, which can cause condensation to freeze solid on the evaporator coils, especially in high humidity.
What causes AC coils to freeze in the summer?
AC coils freeze in the summer primarily due to a lack of airflow or continuous operation that drops the coil temperature below freezing. When you set the thermostat too low, the system never cycles off to rest. The extreme humidity in the air condenses on the continuously chilling coil, eventually freezing into a solid block of ice that blocks airflow completely.
Why is my AC blowing warm air after I lowered the temperature?
If your AC starts blowing warm air after you drastically lower the temperature, your evaporator coil has likely frozen over. The thick layer of ice acts as an insulator, preventing the system's refrigerant from absorbing the heat out of your indoor air. Because heat transfer is blocked, the blower motor simply pushes room-temperature air back through your vents.
What is the best temperature to set your thermostat in summer?
The Department of Energy recommends setting your summer thermostat to 78 degrees Fahrenheit when you are at home and need cooling. This setting provides a solid balance of comfort and energy efficiency while preventing your system from being overworked. You can supplement this setting by using ceiling fans to make the room feel several degrees cooler.
How long does it take for a frozen AC coil to thaw?
A frozen AC coil typically takes anywhere from 4 to 24 hours to thaw completely, depending on the thickness of the ice and the temperature of the surrounding air. To thaw it safely, turn the cooling function off at the thermostat and turn the fan setting to "On" to circulate warm indoor air over the frozen components. Never attempt to chip the ice away with tools.
Protect Your System from the Summer Heat
Understanding the danger of setting your thermostat below 70 to cool the house faster is the first step in protecting your investment. Realistic thermostat settings prevent frozen coils, reduce severe wear and tear on your compressor, and keep your energy bills manageable. Remember, your thermostat is a switch, not an accelerator pedal. If your system is running constantly but struggling to keep your house comfortable at a reasonable temperature, lowering the dial further will only cause a breakdown.
A struggling system needs a professional mechanical diagnosis, not a lower setpoint. Do not wait for a frozen coil to destroy your compressor. Schedule a comprehensive inspection today to ensure your equipment is clean, calibrated, and ready to handle the peak heat safely.